Easily the most frequent question we receive from our valued customers is:
“I don’t have enough storage—what can I do?”
Our go-to answer?
“What about a headache rack?”
Why Install a Headache Rack?
A headache rack offers more than just storage. It provides crucial protection for both your cab and your cargo.
With the right setup, a headache rack can prevent forward-shifting loads from damaging your truck, organize your essential tools and binders, and even contribute to regulatory compliance.
For many flatbed truckers and fleet managers, it’s one of the most practical upgrades available.
What to Consider:
- Do you have, and are you willing to use, the space needed on your catwalk?
- While hooked onto a trailer, will you still have the turning radius you need?
- Will the headache rack interfere with any ventilation on the back of your cab?
Want to have it professionally installed for you, which is what we recommend? Go ahead and call the appropriate number at the top of the page and ask to speak to the service department and book an installation appointment.
Not sure if a headache rack will work for you? Our sales team will recommend the right style and size from the different brands that we have vetted and thus recommend and stock. Simply call the number at the top of the page that corresponds to the location most applicable to you to speak with one of our amazing team members!
Can’t make it in? No problem - send us photos of your setup to [email protected] and we’ll do our best to assist you remotely.
What Best Suits Your Needs?
Once you have made sure a headache rack will work for you, it's time to choose a style. Not only does Verduyn Tarps strive to be a one-stop shop for all flatbed needs, we also want to provide our customers with options that make their truck a source of pride.
Do you haul chains, tarps, straps, or dunnage blocks? We offer racks with built-in trays, lockable compartments, chain hangers, and tool holders that are customized for your day-to-day operation.
Whether you want a low-profile rack to maintain visibility or a full-height unit for maximum storage, we’ve got you covered.
Aluminum or steel? Polished or Checkerplated? Even want to add your logo or company name as we offer in-house branding with custom decals and stickers? Whatever the configuration, we’ll help you choose a rack that matches your rig and your needs.
To see all of the options and availability, visit our Headache Racks and Accessories page.
Installation
For installing a headache rack, you’ll need a U-Bolt Mounting Kit, which includes:
- 4 U-bolts
- 8 nuts and washers
- 4 lock plates
- 2 rubber strips
Installation Instructions:
Step One:
Identify where the two support legs of the headache rack will sit on your truck’s steel frame.
Step Two:
Place one of the rubber strips on the driver side frame and place the second rubber strip on the passenger side of the frame. Place these strips where you would like the support legs of the headache rack to go. This cushions the contact point and reduces wear.
Step Three:
Using appropriate lifting equipment for safety and security, such as an overhead crane and sling, lift and lower the headache rack on top of the rubber strips.
(See our recommended sling for Canadian locations: 2-Ply Eye-Eye Sling – 2" x 12')
Step Four:
As seen in the picture below, secure the rack using the U-bolt kit . (See our recommended U-Bolt Headache Rack Mounting Kit)
- The bolts located closest to the rear of the truck have the U bolt facing down. These are then bolted with the lock plate hugging the bottom of the truck frame. Tighten these bolts as tight as possible.
- The U-Bolts closest to the cab are installed facing up. The lock plate is then located between the structural frame of the headache rack. Tighten bolts as tight as possible.

Airlines
Once you have the Headache Rack installed, you may be left wondering what to do with your airlines. Don’t just bungee them to your catwalk—Verduyn Tarps offers clean, professional solutions.
Pogo Stick Option: Keeps airlines elevated and tangle-free. The Pogo Stick is an effective solution for this.
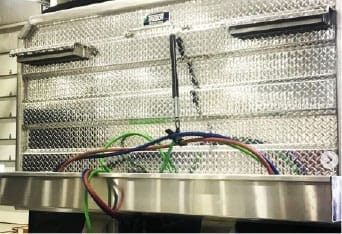
Grab Handle Integration: Another airline solution that has become popular among our valued customers is simple and effective. In the picture below you can see we have installed a “Grab Handle” in the middle of our Chain Rack and Tray headache rack. By attaching this handle the airlines are up and out of the way allowing for a safe and clear catwalk.

For fleet managers installing racks across multiple units, these airline upgrades help reduce driver frustration and improve safety compliance. Keeping lines elevated prevents tripping hazards and minimizes wear over time. If you're setting up a new unit or replacing an old system, don’t overlook the small upgrades—they make a big difference.
Whether you’re an owner-operator or managing an entire fleet, Verduyn Tarps is here to help. From product selection to professional guidance and after-sales support, our team is committed to getting you set up right the first time.
We’re here to help!
Call at the number at the top of this page, or visit us today, or fill out a repair request form.

